Imagine you suddenly lose your home’s safety. Maybe a severe storm damaged the roof, or a wildfire evacuation forces you into an unfamiliar setting. In times like these, having a quick way to build a temporary shelter can mean the difference between comfort and misery. It’s not about crafting a luxury cabin. You just need something that keeps you dry, protected from wind, and shielded from the worst weather. With the right materials and some know-how, you can piece together a simple structure in under an hour.
Think about a makeshift roof over your head. That alone can save you from rain, snow, or scorching sun. You might already have tarps, ropes, and duct tape in your car trunk or storage closet. Those items become your best friends when there’s no time or money for anything fancier. Even if you’re not an outdoor expert, you can follow a few practical steps to put up a quick, sturdy shelter and buy yourself peace of mind until you find something more permanent.
Consider the times when humanity had to improvise. During some of the harshest conflicts in history, people used rubble and scraps to protect themselves from extreme weather. In modern times, preppers and survivalists keep simple supplies on hand for the same reason: you don’t want to get caught in a downpour without a plan. Once you understand how to gather local resources and piece them together, you can create a life-saving structure anywhere you can find a few trees or a clearing.
Start with Site Selection
Your shelter is only as good as the space you choose. Aim for higher ground if there’s a risk of flooding. Look around for natural windbreaks like boulders or thick bushes. That way, you’ll have one less side to shield from the elements. Avoid areas under dead or damaged trees. The last thing you want is a broken branch crashing down during a storm. If you find a sturdy tree with a wide trunk, you can use it as part of your shelter’s support system.

Look at the sky. If you see storm clouds, make sure your chosen site isn’t in a spot where water pools easily. If the wind is strong, pick a spot that’s somewhat blocked by natural structures. Watch out for insect nests or poisonous plants. While a small space might feel claustrophobic, it’s often easier to heat or protect than a large area. A well-chosen location means you can spend less energy keeping the interior cozy.
Gather Simple Tools
You don’t need a toolbox that weighs a ton. A few items can go a long way. Paracord or rope is incredibly handy because it’s lightweight yet strong. Duct tape stands in for nails or screws when you don’t have any. A basic multi-tool with a knife and pliers can cut branches and secure materials. If you have a camping shovel, use it to clear away debris or dig a shallow trench around your shelter to channel rainwater away. Even thick gloves can help you move sharp sticks and stones without hurting your hands.
Related: 8 Unusual Uses for Duct Tape in a Crisis

If you don’t have professional supplies, improvise. Use large rocks to hammer or anchor things down. Gather sticks, branches, and leaves to form walls and add insulation. Look around your car, basement, or garage. Sometimes, an old blanket, a worn tarp, or even large plastic sheets can turn into reliable roofing materials. The goal is to keep your list short and your bag light.
Set Up a Basic Frame
A simple frame transforms random materials into a real shelter. One approach is the lean-to design. Find a sturdy tree or use two upright poles to support a crossbar. Then lean branches, wooden planks, or metal rods against it at an angle. If you do this right, you’ll have a slanted surface that deflects rain and wind. Secure everything with rope or duct tape, making sure it’s not so tight that the tape tears when the wind picks up.
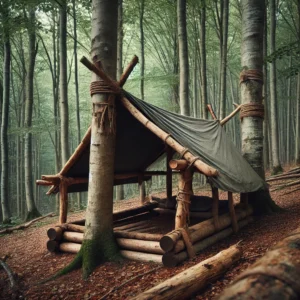
If you find two trees fairly close together, you can tie a rope between them at shoulder height. That rope becomes your roof’s main support. Then you drape a tarp or plastic sheet over the rope, letting it hang down on both sides. Weigh down the edges with rocks or secure them to stakes in the ground. That forms a tent shape in just a few minutes. If you only have one large plastic sheet, fold it around the rope and secure it. This keeps water from dripping through. It’s quick, easy, and you can do it alone.
Insulate and Waterproof
Your frame might keep off some rain, but it also helps to add insulation. Gather leaves, pine needles, or dry grass. Stuff them between layers of your tarp or arrange them on the ground where you’ll sleep. Think of it like a natural sleeping pad. Extra layers help trap warmth and keep you off cold, damp soil. If you find large pieces of cardboard or old blankets, put them on the ground too. Staying dry is just as important as staying warm.
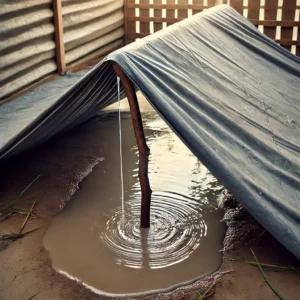
Waterproofing is a big deal. Even small leaks can turn your makeshift home into a soggy mess. If you see holes or tears in your tarp or sheet, patch them up with duct tape. Press firmly to seal edges. If you have a second sheet or tarp, overlap it on top so water trickles off. A small trench or perimeter drainage channel around your shelter can guide water away. In heavy rains, that extra step can keep puddles from seeping in.
Ventilation Matters
You might be tempted to seal every crack, but fresh air is crucial. Without ventilation, condensation forms inside your shelter, leaving you damp and cold. A small gap along the top or near the entrance lets moisture escape. That same opening also prevents the buildup of fumes or smoke if you choose to set up a small candle or cook in a controlled manner. Try not to seal your shelter so tightly that you suffocate. Balancing insulation with airflow is key.

When you’re in a humid environment, keep an eye on the inside of your shelter. If you see droplets collecting, open a flap or tilt your tarp slightly more to improve airflow. In dry or desert conditions, a small breeze inside can also help cool things down, so plan for weather extremes. You want enough coverage to block rain and wind while still circulating air.
Secure the Edges
Flapping tarps make noise and let in drafts. Check every corner to make sure it’s secure. You can use stakes, large rocks, or even small logs to pin the material to the ground. If your rope is slipping, wrap a layer of duct tape around it at the tie-off points for extra grip. Check the tension of your lines every now and then. If you see the tarp sagging, tighten things up a bit. A snug shelter holds its shape better when the wind picks up.
In some cases, you might find heavy branches to lay across the bottom edges of your tarp. That creates a sturdy seal without requiring fancy knots. Always consider how the wind might shift. If the breeze changes direction, you might need to rearrange your corners. It’s easier to fix small problems before they become large tears in the middle of the night.
Light and Basic Comfort
Once you have a structure, think about lighting. If you have a flashlight or headlamp, that’s great. Otherwise, a small battery-powered lantern or even a candle can offer some illumination. Just be cautious with open flames. Keep them away from your shelter’s walls or any flammable material. A small LED light is often the safest bet. It uses little energy, doesn’t produce excess heat, and won’t tip over as easily.
Comfort goes beyond dryness. If you have space, set aside one corner as a sleeping zone. Lay down your insulation materials there. Keep the center open for moving around. If you have a small backpack or a plastic bin with essentials, store it where you can reach it easily. This organization helps you find what you need quickly, whether that’s food, a first-aid kit, or a lighter.
Improvise with Available Materials
Look for anything around you that can reinforce your shelter. Large leaves, strips of bark, or even cardboard sheets can act as shingles over your tarp. If you’re missing rope, twist strips of fabric or duct tape into makeshift cords. If you lack nails, sharpen a few sticks to anchor corners into the ground. In a pinch, you can carve grooves into branches to help them fit together like puzzle pieces.
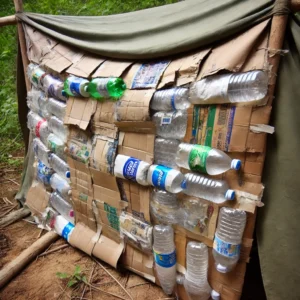
It’s about seeing ordinary objects in new ways. A broken umbrella can add a protective flap over your entrance. An old shower curtain might serve as a waterproof wall. Plastic bottles can be cut open and flattened to patch holes. Every scrap of material has the potential to solve a small problem. Tap into that creativity, and you’ll find that you need fewer expensive supplies than you thought.
Maintaining Your Shelter
A temporary structure can start to sag or tear after a few hours, especially if the weather is rough. Keep an eye on your supports, especially if branches are bending or water is collecting in pockets of the tarp. If you see a bulge of water, gently push it off to the side, or adjust the angle so it drains properly. If you have duct tape, reinforce any weakening points before they snap.
Remember that temporary means just that. This isn’t your forever home. But if you’re caught in an emergency, the goal is to stay safe, dry, and somewhat comfortable. Taking a few minutes to maintain your shelter can prevent a total collapse in the middle of the night. That little bit of extra caution can save you from sleeping in a muddy puddle or waking up in a drenched sleeping bag.
Conclusion
Building a temporary shelter in under an hour is a skill anyone can learn. You don’t have to be an expert in carpentry or a wilderness guru to get it right. You just need the right materials, a dash of creativity, and a focus on the essentials: weather protection, ground insulation, and stability. Once you’ve picked a good site, set up a basic frame, and sealed off the edges, you’ve already done the bulk of the work. The finishing touches like insulation, ventilation, and a bit of lighting help you stay safe and comfortable.
So the next time you’re caught off guard by a sudden storm or forced to camp in your backyard while your house repairs are underway, remember these steps. A quick shelter doesn’t have to be perfect. It just needs to do its job: keep you out of the elements and give you peace of mind until you can find something better. Start practicing now, and you’ll be ready whenever life tosses you a curveball.